Showing posts with label DIY. Show all posts

Friday, September 26, 2014

DIY Paper Autumn Crafts

Earlier this month I showed you my super easy and simple autumn mantel for the coming fall season. Hopefully it gave you a little bit of fall crafting inspiration that you can do yourself on the cheap. In fact, it was so cheap it was FREE!! I love when that happens.

Now I'm going to share the whole process for the crafts I made for the mantel. If you saw my DIY paper Christmas trees from last year's Christmas (super great quality pictures, you're welcome) then you'll see the process for the pumpkins is very similar exactly the same. That's why I didn't include any progress pictures for them. Just kidding. It's because I forgot to take any pictures. You're welcome, again.

In a nutshell, I picked out autumn-y paper from my scrap stash. Then I made a stencil out of one of the cardstock papers of a pumpkin shape. I would imagine just using a circle could work as well. I just thought the butterfly-type shape would sit more straight.

After cutting a million pieces of paper, I folded them in half, used some tape and taped the pieces together. I tried to line up the sides as much as I could, but I just had to trim some of the edges to make them look even.

Then I remembered that pumpkins have stems. I grabbed my twine, opened up one of the sides of each pumpkin, and made loops with the twine. Glue those in, hold them together for a bit. Then you're good to go. I think it would have been cute to add some vines or something with ribbons, but I wasn't that ambitious in the moment. Maybe I'll add them later on a day when I'm feeling particularly crafty again.


Now, on to the little leaf art thingy I made. I'm really not sure what this is called. Again, cut out strips of my autumn-y paper. Sketched and cut out the shape of a leaf. I wanted to do a maple leaf, but I knew my drawing skills weren't that advanced. I figured I'd stick with the tear drop shape.

Then I put that cut-out on top of the glued-down strips, and glued that down. I trimmed the whole thing a little bit because it was originally 12 by 12 paper. But I thought there was too much white space on the sides.

After trimming, I remembered I had some fun fall stickers and embellishments. I added those and here we are!


I love my pumpkins. They gave my living room just the right amount of autumn coziness. Even though it's been in the 80s and 90s this week. Boo. I hear this weekend is supposed to have more of a fall feeling weather-wise. Hooray!


What cool crafts have you been making? Or have you been decorating for fall? It's all so exciting and I can't wait to do some more in the coming weeks!

Sunday, September 14, 2014

Autumn Mantel 2014

YAY! It's getting chillier outside, so I can finally justify starting some autumn crafting! And in just a week or two, I'll start some Harry Potter Halloween crafting! Anyone else as excited as I am for that?

It seems that Sunday mornings have kind of become my crafting days. And I'm fine with that at the moment. I find it relaxing and somewhat meditative. I loved this message someone shared on their facebook this morning.

Create
A message from Dieter F. Uchtdorf
from The Church of Jesus Christ of Latter-day Saints


Since I'm all kinds of excited about fall, I wanted to change up my mantel in the living room. I'm not nearly as cool as those women that change every single thing on their mantel and surrounding area for every season. One day I'll be that cool...and I'll have stuff to even do that. For now, I just change a little bit to make it feel more fall-ish in my home. It isn't a huge change, but my home feels cozier already!


As you can see, I literally only changed what is sitting on the mantel. I did take one picture off the wall so I could put that little leaf craft I made this morning in that space. I really enjoy how the bricks of the fireplace are also an orange/red (painted by someone that previously lived here), and it just matches the fall-ness so well.

Did you see the two crafts I made that are now gracing my living room? I already told you one a second ago. I'm sure you all know exactly what I'm talking about since you look at my mantel every single day, right? Oh. Ok, then I'll show you.


I love how these turned out! I really wanted to put a big bunch/pile of fake pumpkins on the mantel because I could use them all autumn long. However, we're always trying to save up for something, am I right? Right now, it's the little baby dinosaur in my belly. So I decided not to spend any money...and really I don't need to! I think these turned out great. However, I might go see what the dollar stores around here have in stock sometime soon to add to the pile. We'll see how much motivation I have later on.

I'll share how I made the pumpkins and leaf picture in a later post. (Although they weren't that hard and you could probably figure it out just by looking at them.)

What have been some of your favorite fall crafts or decor that you're going to add to your home this year?

Happy autumn crafting!

Saturday, September 6, 2014

Painted Plank Wall Decor DIY

I consider this project only partially DIY. The cool thing these days is to find pallets, take them apart, and make amazing and cute things from the boards. Well, that intimidates me. So when I found this unpainted plank thing, I totally got it because I knew it would be lovely in my home. And it would be easy to paint and make awesome.


I went out to the garage and found all the paint sample jars I had purchased over the past year or two. I crossed my fingers and hoped they were still paint and not blobs of gross. After some vigorous shaking, I had four different paint colors.

I started by doing every other plank, let those dry, then did the other planks. I did tape off the planks I wasn't painting just because I didn't want the hassle of other colors showing through. This was the easy part. I thought it would be difficult because I had to do some paint color mixing to get the shades light enough to match what I wanted.


I'll have you know that, no, I did not mean to have that streak of lighter color on that second plank down. But if you saw this in person, you'd see that a couple other planks are kind of streaky because of the mixing of colors. I didn't mix well, and I didn't wash my brush between a few colors because I was hoping it would become a teensy bit streaky. In my experience, I like things best when I just go with the flow instead of trying to plan out every tiny detail. Plus, that turns out to be a lot more work.

The next part was the difficult part. I wanted a word on this, something different than "home" or "love." I enjoy things that say that, but I have other objects like that in my home already. Plus, if I'm making this myself, I might as well make it personalized to us. After making a list of nearly 20 words/phrases, I decided to go with something a little bit silly. But it's still something I love.

As you can see, I went with "be amazing." I was having a real dilemma choosing between "be happy", "be brave", or "be amazing." And then I was having a dilemma about whether this would sound like it was an order instead of something inspirational. I'm hoping people see it as uplifting. I guess I'm in my house most of the time, and I get to decide. I mean, I live here, right?


The writing is not even close to being beautiful and perfect, and I don't care much. As it hangs there, I might do some touch ups if something keeps bugging me over and over. But sometimes the most imperfect things in my home are my favorite.

I love how it's pretty understated. My walls are a light gray color, and the colors in the living room are shades of gray and blue and brown. I already have other things that are extra colorful that stand out. So I just wanted this to fill that spot by my stairs with something sweet. I think it turned out perfect!


Hooray for nesting! Am I right? If it hadn't been for my sudden urge to want to craft something while Steve was out with the scouts, I don't think this project would've been finished for many moons. Let's be honest, I originally bought that plank thing last summer. He he.

Did I mention that baby's room is getting the last coat of paint this weekend? Then I get to share our progress and ideas for the fun stuff with you!


I linked up this project over at DIY Show Off. This is the link to That DIY Party. I'm still never sure I did the link correctly. Hopefully it all works for you! But please check out the other cool things people made over there.

Friday, August 15, 2014

DIY Dresser Ideas :: For a First Timer

Hey there party people!

Steve and I have been working on clearing out future baby's room. And we have furniture in there that either needs to exit our lives or be DIY-ed and refashioned.

Enter: This dresser.


I believe Steve said that all his brothers have used this dresser. And trust me, it shows. It looks like either little ones or a dog have chewed on some of the edges, and there are chips all over it, drawings inside the drawers, some of the drawer tracks are skeewhompus, and one of the back legs is broken so it wobbles.

Originally I was thinking of making this dresser into the changing table for the baby's room. It has a lip on the top that would be great for the changing pad to rest against, and then other things won't fall off while I'm holding on to baby. However, I just wasn't feeling it. Also, I have never repainted/refinished furniture before. I didn't want to screw up on something for the baby's room. Also, I didn't want to feel bad if I changed my mind and gave up before the baby came.

We were just going to put it on the curb or donate it, but then we came up with a brilliant plan. Ok, it's not that brilliant, and I've seen it done lots of times. It just felt brilliant for us. We have been wanting a taller TV stand for our television in the basement ever since we moved in. We measured and this dresser is a great fit for the spot where our TV stand would go! DING DING DING!!! It would create some great storage and be something new-ish for our home. Wins all around!

Now the question remains - what do we do to the dresser? I only have a couple vague ideas at this point. I decided since it was going in the basement, and it was my first attempt on DIY painting a dresser, I wanted to try something fun and maybe a little "out there." However, it can't be too time consuming because I'm afraid I'll lose heart in the middle of the project.

So does anyone have any ideas? Send me pins, pictures, comments, emails, etc. so I can see what you've seen and imagine. I'm having trouble really attaching myself to an idea for this.

Thursday, May 29, 2014

Wreath wall collage

Hi friendlies. I just wanted to share this little project I finished. I have been imagining this for a while. I like wreath-like door decorations, but I hate storing them. I have to stack them, which flattens or squishes the decorations. Then when I want to change which one is on the door, I have to pull them all out to get to the one I want, which is always inevitably on the bottom of the bin.


To remedy my problem, I just put the picture hanging hooks in the wall at different heights and hung up my decorations. Now my craft room is a little more colorful and always festive! And all my door decor and wreaths are easily accessible. Win!

A quick and easy project with great results!

Saturday, December 14, 2013

DIY Paper Christmas Trees

Here is this year's first Christmas DIY project! Woohoo!!


I made these right after Thanksgiving, so I'm not sure why it took so long for me to post this.

And this is a post where you really get to witness my skills at NOT being a photographer. You are welcome.

To get started I gathered a bunch of paper. Some paper was Christmas-y, some was only somewhat Christmas-y. But putting some papers together makes it all look Christmas-y.


I made a template on Microsoft Word of a Christmas tree. It probably wasn't perfectly symmetrical, but I was just hoping for it to work out.


I traced and cut out a ton of little trees. Then I put the trees into groups of 4. I'm sure this could work in groups of 3 or even more than 4. I tried to make each grouping have something like 2 mostly-green and 2 mostly-red trees. And I didn't plan it that way, but I actually had the perfect amount. I'm obviously a genius.


I folded each tree in half. Then I got the little scrapbooking sticky square things and used those to stick the trees together. I just lined up the folds because I knew the outsides probably weren't symmetrical.


I moved some of my mantel pictures and put all the trees on my mantel around my stocking hangers. It was like a cute little colorful forest. And it was free! Can't beat that!


Again, my phone does random, cool things to my pictures.

That is our family Christmas card this year. Love us. I have the coolest family. Not exaggerating.


I love these little trees!!! This craft was so easy and I really enjoyed how they turned out. I'm excited to be able to use them year after year.

Friday, November 15, 2013

Thankful Banner

YAY! I finally got the time to make another Turkey Day/autumn craft!!


Well I've seen a bunch of different kinds of Thanksgiving banners on Pinterest lately. Banners are kind of the cool thing to do right now. I would show you some of my favorites, but I'm too lazy. Just find me on Pinterest. ;)


Since it's Friday, I finally got to workin' on my own Thankful Banner. I had a few different styles in mind, but I finally chose this one. It worked best for the supplies I already had on hand. So there ya go.

I had the big letter stencils and I traced them onto paper. The white paper actually has some small leaves and twigs on it. Then I got a bunch of different brown/dark red/green papers from my collection of scraps. Traced, measured, cut, measured, cut, traced, cut, punch holes, string with yarn. TA-DA!!

I was worried that the letters would be too big and that the banner would turn out entirely too large for the area. But after putting it up, it actually worked out great for the spot I put it in. I love when things work out better than expected.


It was super-duper easy, and free.  WIN!

Then I decided to decorate my two candles that I used for my Harry Potter Halloween. I had also seen similar (cuter) ideas on Pinterest. I just cut out leaves again like I did for my Thankful Tree. Then wrapped some paper around the candle and tied the leaf on with twine. BAM. Easy and free again. I'm not really sure where these are going yet.


My Thankful Banner is definitely quirky because it has a bunch of different paper patterns. But I actually think I like it that way. As I've been decorating the house little by little, I've realized that my decorating style is simply that: quirky. So I'm running with it and really enjoying it! As long as we like it, that's all that matters, right?


Have fun decorating for the holidays in your own style!

Wednesday, November 6, 2013

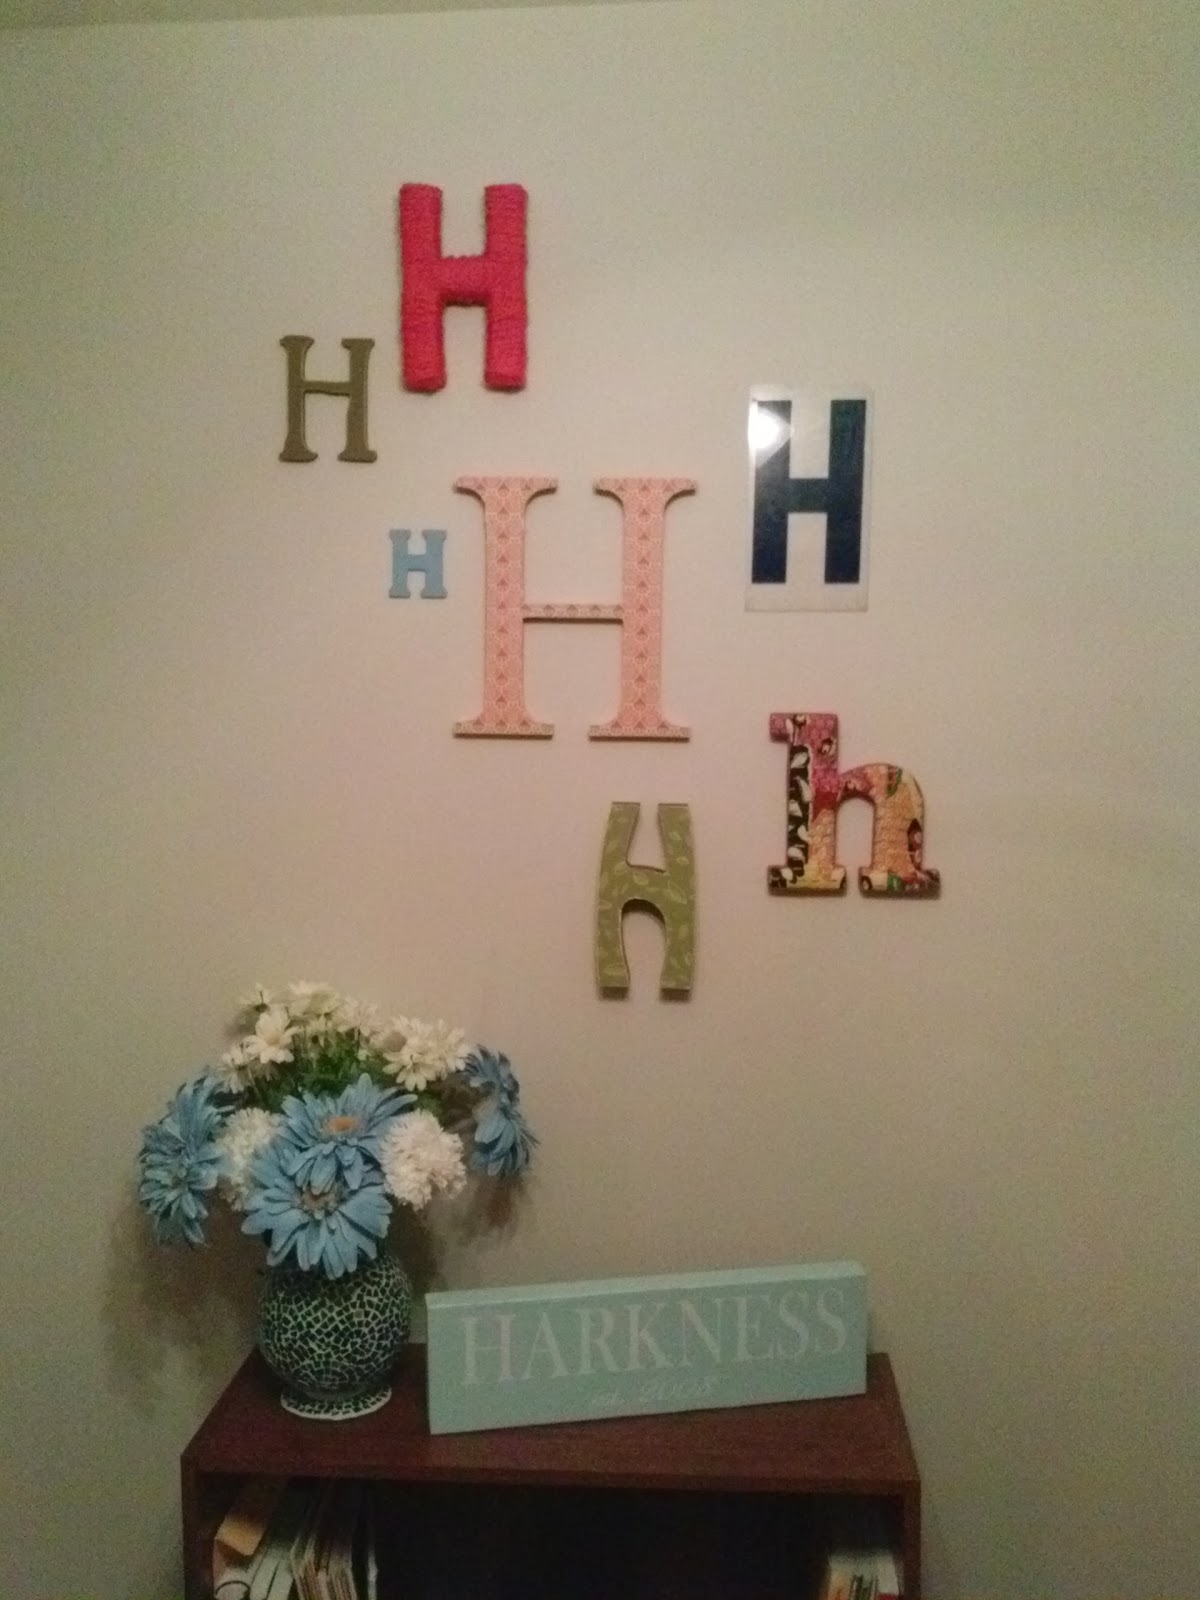
Monogram Collage

I have been eyeing these awesome monogram collages on Pinterest for quite some time.

Here are my faves:
This one over a headboard from DIY Home Pin
and
especially this one from Dear Lizzy.

Well I've been collecting the letter H for maybe a year and have finally decided to make the collage! Yesss - productivity! So I laid out what I have on the folding table. I got 4 cute little plates from the DI to fill space so it wasn't just H's. (Spoiler: They didn't even work out!)

Here was my first (of many) arrangements.

I have seen some people make cute little random quotes with these collages and I love them. So I made one. Just got some scratch paper that somewhat went with the colors I had already and stamped the words on there. Easy peasy.

I added that into the collage and rearranged a lot of things. I wanted to see what a diagonal design looked like and tried it. Eh. Not diggin' it yet.

Then I asked for friends to give me some input to get things balanced better and some people said it looked like "ho ho ho" for a Christmas decoration. So now that's all I can see! Boooo.

Out went the plates. And after much deliberation, I even took out my cute little quote. Because all the H's were wood and stuck out from the wall, the paper just wasn't working well with everything else. But I still wanted this diagonal layout for some reason.


I guess I should've gone with the simple route that I usually take. It practically always works.

I went with just the H's. And I tried to put them in a diagonal type of clump again. Not sure how well it worked. But I'm actually diggin' it. I realize that some of my letters are crookedy - but on a couple I haven't actually use my more permanent hanging devices. That will be good if I decide to move things later on, I guess.


Please excuse me for being extremely lazy and using only my phone camera for pictures lately. I know the pictures aren't as sharp or true to their colors. But my phone is easy because it sends pictures directly to my account. Win, right?? Yes.


I am really enjoying it so far. And I think there is room to add more H's when I happen to find them. Just like my mantel picture collage seen here, it makes me smile when I see it. So I think that's a plus. We'll see how I feel a couple weeks. Actually, I probably won't care about it for a few weeks until I'm done taking the GRE. *stressssssss* 

Happy DIY-ing! 

Thursday, October 31, 2013

Harry Potter Halloween : The Final Product

HAPPY HALLOWEEN!!!!

I am just sitting here with hubby pondering the beauty of Halloween. It's the only time everyone walks around dressed up like crazy and asks every stranger you set eyes on for candy. What is this madness? Yet, it feels so magical and I look forward to it every year.

This is the first year that we have gone all out on decorating. It has been so fun to just be creative and think of what would bring even more magic to this holiday. Literally...MAGIC. :)

I'll just go ahead and overload you with pictures now. Enjoy!!


I took all the things I've made so far outside.

Got names on all my potions


Our baby Hedwig with crazy-looking eyes.


Homemade broomsticks. Thanks Mary!


I love this picture. So. Much.

I named all the candy fun names from Harry Potter.


Our very own Mrs. Norris even made an appearance.


TA-DA!!!!!
We had so much fun putting all this together. A special thanks to my hubs that was out on the front porch on a ladder hanging my candles at 10:00 pm the night before. Love him. And thanks to Pinterest for nearly every single idea on this project. :)

I hope you had a happy and safe Halloween!!!

Wednesday, October 30, 2013

Harry Potter Halloween : Polyjuice Potion Spell Book & Finishing Up

Mmmmm, well this happened yesterday... I don't want to talk about it. It's too much.


I made this little Harry Potter scarf for a friend's son. I put the little fringe on it this time to add some interest. Still obsessed with the cuteness.

I finally finished the Polyjuice Potion Spell Book!!! YAY! I started this project at least 3 weeks ago. I've just been slow on getting all the finishing touches.

It started out like this:

Leftover paint and sharpie turned it into this:

TA-DA!!!

I also got those glass things from DI. The biggest one was $1 and the rest were 50 cents. So I'm going to fill them with colored water for "potions." That candle was a random thing I had when I was younger and my mom sent it to me with my last shipment of "things I'm taking back to Lynnette now that she has a house to store it all in." On the left you can also see some of the parcels I made as well.

I got this idea for this book from this blog, Snowy Bliss. (Thanks for the inspiration!) So cute!!! She has cooler equipment than me and hers looks cooler. But I am actually pretty pleased with what I did in plain ole Word. Also, I love her tablescape with all the potions and decor.

Cost breakdown:
Textbook: $4 from DI
Glass "bottles": $2.50 total
Butcher paper: leftover from previous projects
Twine for parcels: $2.99 but I barely used any. I can use it for anything.

I do have to mention something for all the Potterheads out there. I know that the Polyjuice Potion wasn't technically in the Advanced Potion-Making textbook. I think it was in Most Potente Potions...but I just did it. So don't be mad, please! ;)

Even though I started all my Harry Potter Halloween over a month ago, I am still scrambling to finish everything the night before. My hubby is so sweet and is skipping out on an invitation to watch the Jazz game with a friend to help me hang things and finish it up. (That's true love, everyone.) And my really cool sister-in-law is also coming over to help.

Here is what I hope to finish up tonight:
-Floating candles made from toilet paper rolls or paper (and hang up)
-My styrofoam owl
-Marauder's map (I solemnly swear that I am up to no good)
-Simple and easy house banners from paper
-Potion labels
-Broomsticks
-Finish up the dementors (hang up)
-Sirius Wanted posters
-Hogwarts letters
-Muggles Beware sign
-Paper sorting hat (This may or may not happen)

I know this probably seems like a boatload to finish in one night, but I am doing all this in the easiest ways possible. So I'm totally not worried at all. The only thing that I'm worried about not happening is the sorting hat. And that's only because I may not have the stuff to make it yet. And I'm a little lazy at this point. The owl may also cause problems, but I have the stuff to make it, so I really wanna get it done!