Thursday, October 31, 2013

Harry Potter Halloween : The Final Product

HAPPY HALLOWEEN!!!!

I am just sitting here with hubby pondering the beauty of Halloween. It's the only time everyone walks around dressed up like crazy and asks every stranger you set eyes on for candy. What is this madness? Yet, it feels so magical and I look forward to it every year.

This is the first year that we have gone all out on decorating. It has been so fun to just be creative and think of what would bring even more magic to this holiday. Literally...MAGIC. :)

I'll just go ahead and overload you with pictures now. Enjoy!!


I took all the things I've made so far outside.

Got names on all my potions


Our baby Hedwig with crazy-looking eyes.


Homemade broomsticks. Thanks Mary!


I love this picture. So. Much.

I named all the candy fun names from Harry Potter.


Our very own Mrs. Norris even made an appearance.


TA-DA!!!!!
We had so much fun putting all this together. A special thanks to my hubs that was out on the front porch on a ladder hanging my candles at 10:00 pm the night before. Love him. And thanks to Pinterest for nearly every single idea on this project. :)

I hope you had a happy and safe Halloween!!!

Wednesday, October 30, 2013

Harry Potter Halloween : Polyjuice Potion Spell Book & Finishing Up

Mmmmm, well this happened yesterday... I don't want to talk about it. It's too much.


I made this little Harry Potter scarf for a friend's son. I put the little fringe on it this time to add some interest. Still obsessed with the cuteness.

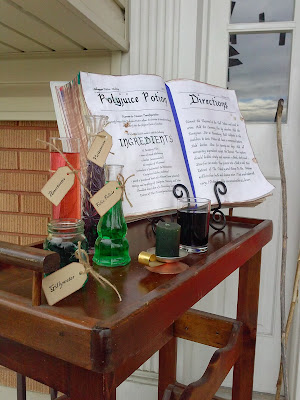
I finally finished the Polyjuice Potion Spell Book!!! YAY! I started this project at least 3 weeks ago. I've just been slow on getting all the finishing touches.

It started out like this:

Leftover paint and sharpie turned it into this:

TA-DA!!!

I also got those glass things from DI. The biggest one was $1 and the rest were 50 cents. So I'm going to fill them with colored water for "potions." That candle was a random thing I had when I was younger and my mom sent it to me with my last shipment of "things I'm taking back to Lynnette now that she has a house to store it all in." On the left you can also see some of the parcels I made as well.

I got this idea for this book from this blog, Snowy Bliss. (Thanks for the inspiration!) So cute!!! She has cooler equipment than me and hers looks cooler. But I am actually pretty pleased with what I did in plain ole Word. Also, I love her tablescape with all the potions and decor.

Cost breakdown:
Textbook: $4 from DI
Glass "bottles": $2.50 total
Butcher paper: leftover from previous projects
Twine for parcels: $2.99 but I barely used any. I can use it for anything.

I do have to mention something for all the Potterheads out there. I know that the Polyjuice Potion wasn't technically in the Advanced Potion-Making textbook. I think it was in Most Potente Potions...but I just did it. So don't be mad, please! ;)

Even though I started all my Harry Potter Halloween over a month ago, I am still scrambling to finish everything the night before. My hubby is so sweet and is skipping out on an invitation to watch the Jazz game with a friend to help me hang things and finish it up. (That's true love, everyone.) And my really cool sister-in-law is also coming over to help.

Here is what I hope to finish up tonight:
-Floating candles made from toilet paper rolls or paper (and hang up)
-My styrofoam owl
-Marauder's map (I solemnly swear that I am up to no good)
-Simple and easy house banners from paper
-Potion labels
-Broomsticks
-Finish up the dementors (hang up)
-Sirius Wanted posters
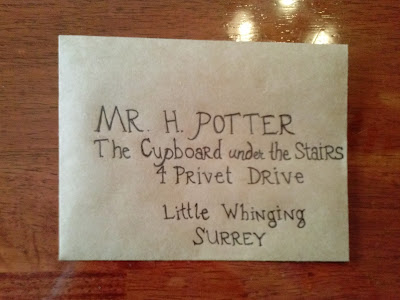
-Hogwarts letters
-Muggles Beware sign
-Paper sorting hat (This may or may not happen)

I know this probably seems like a boatload to finish in one night, but I am doing all this in the easiest ways possible. So I'm totally not worried at all. The only thing that I'm worried about not happening is the sorting hat. And that's only because I may not have the stuff to make it yet. And I'm a little lazy at this point. The owl may also cause problems, but I have the stuff to make it, so I really wanna get it done!

Friday, October 25, 2013

Harry Potter Halloween : Punkins & Signs

Steve's grandparents hosted a cute Halloween party for a bunch of the cousins. We just get together, have some food, and have a costume parade. We attended as our loose interpretation of Harry Potter and Hermione Granger. 

I have NO IDEA how my phone made this gif thing ... It just appeared on my upload list of options from my phone. It's awesome and I love it. But how did this happen??? Harry Potter magic, maybe? Probably.


Steve (grown up Harry Potter) dueling with our nephew (regular Harry Potter). 


Serious spell-casting!


After the party we came home, turned on Hocus Pocus and carved our pumpkins. Obviously we did cool HP themed stencils.

Mine was the HP logo-type-thing. This was the first year I didn't have to fight with my pumpkin for over an hour. It just let me carve it. It was nice. Thanks, Pumpkin.

Steve went with the Deathly Hallows symbol. His stencil got moved halfway through so it got a little skewed, but I still think it looks GREAT!

Then I decided to do some signs. I got a cardboard box, cut off pieces, and wrote with sharpie on them. I tried to vary the writing to kind of match the place. I'm excited about putting these up!!

I also picked up the soundtracks from the library to play all Halloween night. Yessss.

Thursday, October 24, 2013

Try a little harder...

This is my new background on my phone. It's a great, simple reminder to continue improving.


I'm trying a little harder to be a little better every day. I'm especially trying to master the basics of being in line with my Father. I want to do what He needs me to do. I want to be what He needs me to be.

Tuesday, October 22, 2013

Why do you crochet?

You've all seen that I've learned to crochet and I really enjoy it. I love working with my hands and seeing quick results of what I've been working on. I am willing to say that I'm good at it and I like making things for others. My top way to feel loved and show love is through service. Service comes in many forms, so it's a wide array of ways that I can feel loved.

I enjoy making things for others because I spend time thinking about them and making that certain thing. Since I've started crocheting, I have been making small things for loved ones and friends and it has brought me true joy. I love seeing their eyes light up and the smile that stretches across their face when they see their gift that I made! It's one of my ultimate ways to show how much I care about someone.

Because I love crocheting so much, I have quite a few people tell me that I should start an Etsy shop or start selling my creations at boutiques. I thought, "great idea! I can make some extra money!" Well I have sold a few of my things to friends for them to give as gifts. I've enjoyed that. But I decided not to do the Etsy shop or anything formal.

I am one of those people that starts to resent doing something when I realize that I have to fill a quota or do things when I had other things planned. So I knew that if I started taking formal orders from people, I would not enjoy crocheting as much.

This fact helped me realize that I enjoy crocheting as a service. I enjoy making things and giving them to people that are in need of a lift. I have decided to make this the reason I crochet. What better way to use my talents than to serve those around me?? I've discussed this with my husband, and I love his support. He immediately said he agreed that it was a good way to use my talents to show love to those that need it. Even though I'll technically be "losing" money by not selling most of my items, I will be increasing my love and appreciation for others through serving them.

Plus, I get to see people smile and exclaim, "You made this for me?!" Yes, I did!! :)

Saturday, October 19, 2013

New duvet set!

One of the rooms I'm trying most to get looking good is the master bedroom. Since it is one of the three most used rooms in our home, I want to love how it looks. For my birthday, I got some money to spend at Ikea. I had been eyeing a certain duvet set for quite a while and I was excited to finally buy it! And we got a new comforter with it.


It was a bit crazy getting the comforter inside the duvet cover thingy. Steve was taking a nap so I had to get it together all by myself. And it's rough with king-size bedding!! But it's done and I love it very much. It is our very first bedding that is not a hand-me-down from family.


It's kind of masculine, but I think it's versatile. I could add some fun pillows or a throw blanket to make it a good mix of masculine/feminine for the bedroom.

Here are a few goals for the bedroom. Even though these are very low on the list of priorities for home decorating.

  • Get new bedding
  • Cover box springs so they aren't funky looking sticking out under the bed
  • Paint baseboards/trim white
  • Paint second coat of paint on ceiling
  • Put up blinds in window (we've started this like 10 times, the walls right above it are stronger than us)
  • Curtain closet doors
  • Paint frames for wall decor
    • Hang up wall decor/pictures
  • Paint door


Friday, October 18, 2013

Harry Potter Halloween : Front Door

Well, something happened today. It all happened so fast! I could barely believe my eyes when I saw that the project was done and I loved it so much!!


Can you believe it?! And it looks so fun! I thought I would hate it with just the red paint. I thought I would have to get all artist-y on it and do shading and use browns and darker reds to bring dimension to the bricks. HA! Gotchya bricks! Plain old red works great for me! BAM!

I got 3 yards of the brown butcher paper and drew on some light lines with a pencil. I knew if I just free-handed the bricks, they would go all crooked and skeewhompus. And who wants crookedy bricks? Not this lady.

All my bricks. I did make them different heights and widths. I knew they would not be the same, no matter what I did, short of drawing each brick on before painting it. And I wasn't even considering that.

Then I had big letter stencils for the sign. I used a sharpie. I did have to freehand the numbers, and I think they turned out pretty great considering my terrible drawing skills.


Total cost:
$1.50 for 3 yards of butcher paper

TA-DA!!!!!!


What a great way to spend my Fall Break afternoon. :)

Thursday, October 17, 2013

Pumpkin Patch

I haven't been to a pumpkin patch since high school, so I was pretty excited to go back to a pumpkin patch. And I was especially excited to find one with a really awesome corn maze and a pick-your-own-pumpkin pumpkin patch. Enjoy my not-so-awesome phone pictures.

Hayride silly-ness

Pumpkin picks

Very excited to carve these up


It was a fun date night for the autumn. The cold wasn't too bad until the hayride where there was a freezing breeze. But it was fun to snuggle in the cold and find the perfect pumpkin! And wandering around in the corn maze for forever was crazy and fun.

I hope you have a lovely, cozy autumn with your loved ones all around!

Wednesday, October 16, 2013

Harry Potter Halloween : Finished Front Window

Here is the front window reveal. Finally!!

The downside of this silhouette idea is that you can't really get a great shot of it. So here is the best that I could get tonight of the finished project! It's much better in person...promise. I smile big smiles whenever I see it. :D :D :D :D :D :D


I tried to get a picture of the entire window. It's foggy looking...but I guess that adds to the effect.

Each piece of black paper of $1. So the total price for this front window project was $3!!! Woohoo!! This was a major success!


PS.
Have you seen this? I just discovered it today. I like it so much! If you like Nightmare Before Christmas, you'll enjoy it. :)

Monday, October 14, 2013

Harry Potter Halloween : Front Window

Next in my edition of Harry Potter Halloween 2013 - the front window. This is only the beginning.

I have been debating what to do with this ever since I decided on this theme weeks ago. Before the Harry Potter theme, I was going to try something like this Martha Stewart window idea. And I have some Christmas lights, so I was going to put that behind anything to light up whatever silhouettes I put in the window. 

Here is my front window. I have those three windows - so three separate things? or one big thing across them all? or whaaat?!?! I have not been able to decide!!

Today I at least got a start to something. Here is the window: 

I got that black butcher paper a long time ago. Two yards of the paper fit nearly exactly in one panel of the window. Can you say perfect??

I finally decided to do three separate things in the window. In the middle, I am doing "The Chamber of Secrets has been opened. Enemies of the heir, BEWARE."


Now to put it up in the window!!

The rest of the window projects will come soon!


Supplies:
2 yards black butcher paper: $1
Red paint: leftover from past project
Foam paint brush: on hand